How to Recover Raid 5

Are you wondering how to recover RAID 5? It is first important to understand what RAID is, and how your array is structured, before attempting any repairs. RAID is a hard drive technology that allows data to be stored across multiple disks instead of one single disk. RAID causes the operating system of the computer to see the array of drives as a single drive. Users use RAID to provide either enhanced speed (such as RAID 0), or to protect against drive failure (RAID 1). RAID 5 is one of the configurations that provides both of these advantages. Speed is increased, although only slightly, compared to using single disks. The main advantage of RAID 5 is that one of the disks in the array can fail without causing data to be lost.
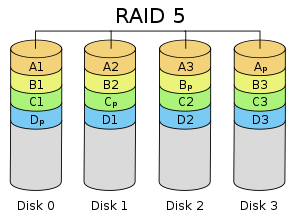
RAID 5, unlike the more common RAID 1 or RAID 0, requires at least three drives in the array. The number of drives allowed in the array is only limited by the RAID controller being used. Calculating the storage space in a RAID 5 array is very simple. Simply sum the storage space provided by all but one of the drives, and this is how large the hard disk will appear to the operating system. In an example array of five disks, four disks would contain data, and the fifth disk would store the parity data. If the parity disk were to fail, the data disks would all still be working, and the data would be intact. The parity disk would need to be replaced in order to return protection to the array. If a data disk were to fail, once it was replaced with a new drive, the data would be rebuilt using the data from the other drives and the parity information on the fifth drive. As long as no more than one disk fails at any given time, complete protection is given.
To restore the data from a RAID 5 array after one of the hard drives crash, one must enter the RAID utility outside of windows. Even if the operating system was loaded onto a drive outside the array, the array must still be rebuilt using the RAID utility. Commonly, instructions will appear on screen describing how to enter the utility. When first turning on the computer, look for a black screen with white text at the top. Multiple screens will flash through, but be sure to pay attention to the one that includes the phrases “RAID”, “HDD”, or “array.” This will be the screen giving instructions about recovering the array. Press whatever key it instructs and the RAID utility will open.
Once the RAID utility is open, look for the option to “rebuild” or “repair”. Be sure that your new hard drive is installed at this point, and remember what SATA port it is plugged into. The HDDs will be listed by the port name/number. Select the name of the new drive, and click “rebuild”. This process will typically take a few hours, possibly longer depending on the capacity and speed of the hard drives. Slower spinning (lower RPM) and larger hard drives will take longer to rebuild, smaller solid state drives will be the fastest. It is important to use the same make and model of hard drive if possible, because the array is only as fast as its slowest link.
